
Week 6: WordPress Plugins/Widgets/Images
HOMEWORK | Week 5 | Review
- Review the client survey’s and make notes and questions about things you are unsure of . Email your client with these questions and post those questions to your blog. Your client needs to respond to your questions by Friday at 5pm.
- Update your Google Calendar, adding deliverables deadlines for resume, portfolio, contact, skills, artist statement, images and home page and share this with your client.
-
- Create a site map and share it with your client.
- Here’s an example:
- Sitemap
- Start sorting through the files that your clients are sending you and prep the images making and color corrections on contrast corrections necessary.
- Sort your content by page and put the text/images/video in the correlating folders on your DropBox. Take a screenshot of your DropBox folder and upload it to your blog.
- Make a list of missing or needed items and relay the information to your client. Give them a deadline.
- Finalize your site map and get your clients approval. List the site map on your blog.
- By next weeks class you should have a final site map and a clear vision for your client’s website. Go page by page and think about how you will start laying out the information. With a finalized sitemap , start drawing some wireframes to see how all the content will fit on your site.
- Settle on a theme with your client’s approval and install the theme.
- Build your menus.
- Set a deadline for your client to deliver their portfolio images.
- On week 6 give me the URL to your blog and your client’s URL where the WordPress site is located.
- On your del.icio.us account tag three Web Sites that focus on WordPress, WordPress themes or anything we learned in class today, and write a note in the Delicious comments section about why you think each one would be a good resource for this class. ALSO, add week 4, week 5, week 6, etc. in your comments section so that I can keep track of your comments. *Make sure you also add the tag: msuinteractivemedia AS WELL AS add additional tags.
***Earn 10 points extra credit by going to the MSU women’s basketball playoff’s and cheering them on!***
Rives: A story of mixed emoticons
Performance artist and storyteller Rives has been called “the first 2.0 poet,” using images, video and technology to bring his words to life.
PLUGINS
Every WordPress site has different needs, but building a content management system that can accommodate every possible situation would make it complex and bloated. It would also make it very difficult for the core WordPress developers to keep the system stable and secure.
The answer to this dilemma is the WordPress “plugins” system, which lets developers extend the system in every way imaginable. There are more than 13,000 (!) plugins available, which let you do things like:
- Install contact forms
- Conduct polls and surveys
- Integrate content from Twitter/Flickr etc.
- Advanced spam control
- Install advanced photo galleries
- Turn WordPress into a sophisticated events system
- Copy blog posts over to FaceBook
- Create a mobile version of your site
- … and tons more
Some plugins provide new fields or pages for data entry in the Dashboard. Some plugins provide new Widgets. Some plugins alter the post writing interface. Some plugins enable special “quick tags” to use when writing a post. Some plugins have no interface at all. Because there are so many plugins and they all work a bit differently, it’s up to you to read the documentation that comes with each plugin. This may be in a “readme.txt” or “readme.html” file in the plugin directory. It may be built into the plugin’s Dashboard page, if it has one. Or it may be on the plugin developers web site. It’s up to you to find and follow the instructions in the documentation carefully! Support is often available on the plugin developer’s web site.
If there is something you want to do with your site that the core functionality of WordPress can’t handle, chances are someone has written a plugin for it.
Install Plugins
The easiest is to simply go to the Plugins section in the Dashboard and click the big Add New button:

From there, you can enter a search term to review a list of matching plugins OR click popular to see the most popular plugins.
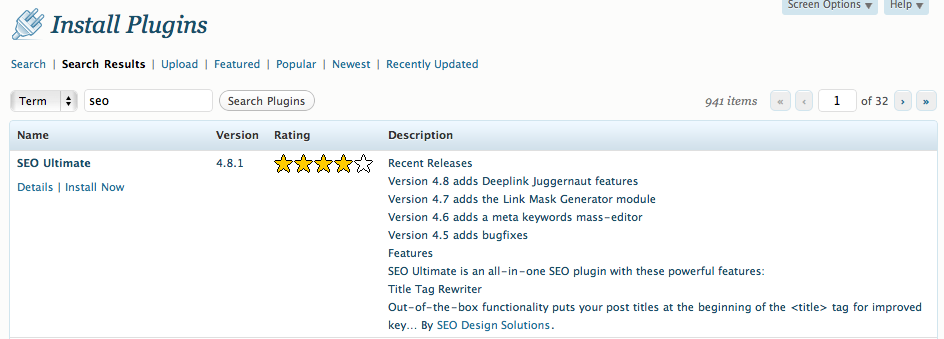
When you find one that sounds promising, click the Install Now link and the plugin will be installed. To make the plugin active, click the Activate link under its name in the main Plugins interface.
Tip: Uninstall (or at least deactivate) any plugins that are not currently in use. Some plugins can be resource intensive (CPU or RAM-wise) and will slow down your site. It’s also possible for plugins to conflict with other plugins, or to be incompatible with future WordPress upgrades. Install the plugins you need, but don’t keep unneeded plugins sitting around!
Popular Plugins
BACKUP AND OPTIMIZE
W3Total Cache:
The ultimate swiss-army knife of caching, from the basic page caching (keeping a static copy of the page), to CSS/JS/HTML minification (making your files smaller), as well as handling uploads to a Content Delivery Network
Broken Line Checker:
Dealing with broken links can be pain if you’re waiting for readers to report them – get ahead of the game with this plugin and automatically check all the sites you’ve linked to before they become a problem.
BulletProof Security:
WordPress Website Security Protection: BulletProof Security protects your WordPress website against XSS, RFI, CRLF, CSRF, Base64, Code Injection and SQL Injection hacking attempts.
SEARCH ENGINE OPTIMIZATION
WordPress SEO By Yoast:
Widely regarded as the SEO plugin for WordPress. This plugin is written from the ground up by WordPress SEO consultant and WordPress developer Joost de Valk to improve your site’s SEO on all needed aspects.
Google XML Sitemaps:
This plugin will generate a special XML sitemap which will help search engines like Google, Bing, Yahoo and Ask.com to better index your blog. With such a sitemap, it’s much easier for the crawlers to see the complete structure of your site and retrieve it more efficiently. The plugin supports all kinds of WordPress generated pages as well as custom URLs.
SEO Friendly Images:
Adds ALT and TITLE meta tags to your images so you can start getting valuable Google Images traffic.
SOCIAL AND COMMENTING
Askimet:
Comes with WordPress, but if you haven’t activated and added an API key yet, you’re missing out. It really does stop the hordes of spam comments that come every hour. Get an API key here. Akismet checks your comments against the Akismet web service to see if they look like spam or not and lets you review the spam it catches under your blog’s “Comments” admin screen.
Facebook Page Publish:
“Facebook Page Publish” publishes your blog posts to the wall of your Facebook profile, page or application.
Sexy Bookmarks:
Installing a Contact Form Plugin
Let’s say you want to add a secure contact form to your site, so you don’t have to put your email address out there where spammers can find it.
There are many contact form plugins out there, but “contact form 7” is a great one and easy to install Install and activate it..
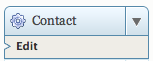
Now take a look at your Dashboard sidebar – you should see a new “Contact” section:
Click it to see an interface something like this:
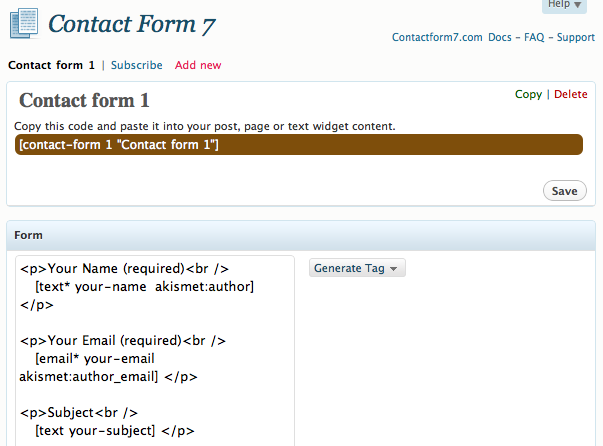
You can use this plugin to create any kind of email-able form you like, but let’s start simple.
Select the text in the red/brown horizontal bar and copy it to the clipboard. Now go to the Pages section of the Dashboard and create a new page called “Contact.” Paste the code on your clipboard into the Body field and click Publish.
Now go to your public site and navigate to yourdomain.com/contact. You should see a basic contact form. Fill it out and make sure it actually does send email to your address.
John Maeda: Designing for Simplicity
John Maeda is the president of the Rhode Island School of Design, where he is dedicated to linking design and technology. Through the software tools, web pages and books he creates, he spreads his philosophy of elegant simplicity.
Working with Widgets
WordPress Widgets add content and features to your Sidebars. Examples are the default widgets that come with WordPress; for post categories, tag clouds, navigation, search, etc. Plugins will often add their own widgets.
Widgets were originally designed to provide a simple and easy-to-use way of giving design and structure control of the WordPress Theme to the user, which is now available on properly “widgetized” WordPress Themes to include the header, footer, and elsewhere in the WordPress design and structure.
Widgets and Sidebars
Widgets all you to modify the contents of your sidebar via drag-and-drop.
If your theme has widget support, you’ll see a Widgets section in the Dashboard sidebar, in the Appearance section:

Your Widgets area should look something like this:

On the left you’ll see a list of “Available Widgets,” while on the right you’ll see the currently available “Widget Areas.” Most themes support just one widget – the “Primary Widget Area.” If you open up the Primary Widget Area, you’ll see its default set of widgets – for search, archives, categories and something called “meta.” Try dragging one of these widgets up or down, then revisit your public site to see how your sidebar has changed. ?
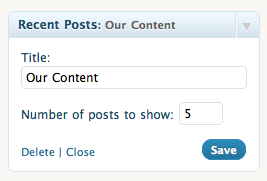
Notice that each of the widgets comes with a downward-facing arrow – click that to discover what things can be changed about the way that widget behaves. For example, click the arrow next to Recent Posts and change the Title field and the number of posts shown. Click Save, then check your site again.
 To remove just drag it out of the Widget Area – the change is immediate. See the widget called “Meta?” That’s the one that causes the Login link to appear in your site’s sidebar. That’s there by default to make things easy for new users, but it’s unprofessional to include a Dashboard login link on your site. Start by dragging that Meta widget out of the way.
Adding Widgets
Try adding a new widget. Find the Pages widget and drag it into the sidebar. Click Save and check your site. Assuming you’ve actually created some pages (not posts) on your site, a list of them will now appear in your public sidebar. Notice that the widget also lets you control how your pages are sorted, and lets you exclude some pages so they don’t appear in the sidebar.
“Text” Widget
Grab the “Text” widget from the Available Widgets section and drop it into the Primary area. Once placed, enter some placeholder text and check your site. The nice thing about the Text widget is that it can also contain HTML and/or Javascript, which means it’s a great way to add embed code from other sites.
Widget Logic
Widget Logic is a plugin you can download that lets you control on which pages widgets appear using WP’s conditional tags. It also adds a ‘widget_content’ filter. This allows you to have your content show up in sidebars on pages that you specifically tell it to appear on instead of appearing universal.
Finding more Widgets
In addition to the default set of widgets, your currently installed theme may provide additional ones. You also may end up with new widgets after installing certain plugins. Try searching theWordPress plugins directory for the word “widget” to find more.
Managing Links
Many web sites include a list of links to related sites in the sidebar, or on a dedicated “Resources” page. To help you curate an excellent set of related links for your site, WordPress comes with a link management tool, accessible from the Dashboard sidebar. After creating and organizing a collection of links, you can cause them to display on your site however you like – alphabetized, grouped by category, in multiple sections, or any which way to Sunday.
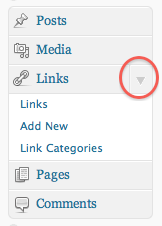
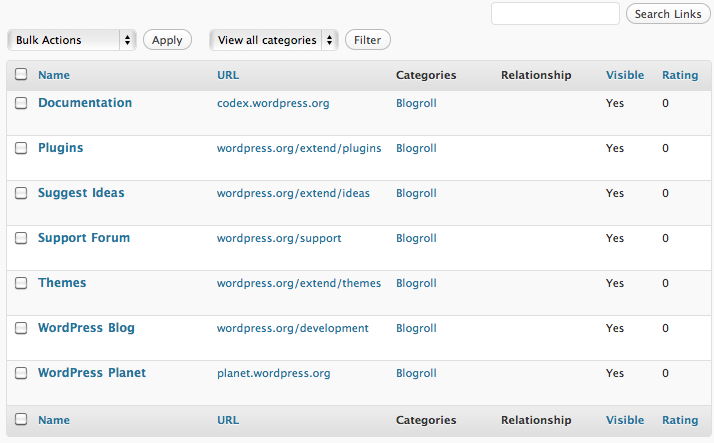
The Links tool comes with a default set of links, which you can either delete or replace.
Notice that all links can optionally live in categories, which are not the same as your Post categories. If your list of links is long, categories can be used to group links into logical sets. You can even use link categories to set up multiple link lists in the sidebar, one for category A and a separate one for category B, for example.
The purpose of the Name and Web Address fields is fairly obvious. To avoid mistakes, remember always to paste in URLs, rather than typing them by hand.
The Description field is optional. If used, the description will be inserted into the link HTML. Howit gets inserted is not controlled from the Link manager, but from the widget you’ll be using to add it to your sidebar, or with the PHP code you add to your template. In some cases, the description will be added as a title attribute that will show up when a user hovers their mouse over the link. In other cases, the description will be made visible on the page, right next to the link.
The Categories section works exactly like Post categories, which you’re already familiar with. You can add new categories on the fly, or click Link Categories in the Dashboard sidebar to manage your link categories.
You can use the Target section to control how a link will behave when clicked. When set to _none, the link will behave normally, taking the user away from the current page. When set to _blank, the link will open in a new browser tab or window (depending on the user’s browser). We recommend sticking with _none (same window). Power users want to control which links open in new tabs and which ones don’t, and get annoyed when web developers make this decision for them. And novice users can get lost or confused when their screen is littered with a ton of tabs and windows.

The Link Relationship and Advanced fields are obscure holdovers from the old days of WordPress and are seldom used. Ignore them. If curious, see the official documentation (Link Relationships, Advanced).
You’ll also notice a “Keep this private” checkbox in the Save/Update panel. Checking this box will cause the link to appear only to you, not to your readers, which is possibly useful for creating documentation links for your authors, or for creating sites meant just for you and your authors.
Install a links list via Widget
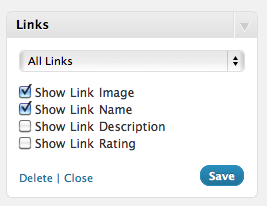
The most common way to get your list of links to appear in the sidebar is with the built-in Links widget. Go to the Widgets manager, find the rectangle marked “Links,” and drag it to the Primary Widget Area. It’ll look something like this:
Click Save, and refresh your site’s homepage. Take a look in the sidebar to see your now-published list of links. If you set up more than one category of links, you’ll seem them broken up like this:
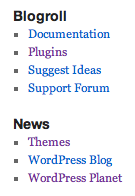
So what if you wanted to break your links up into separate sections, with News at the top of the sidebar and Blogroll at the bottom? Notice that in the Links widget, you can filter by category:
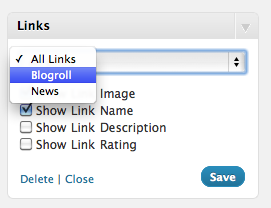
Go ahead and do that for a single category, and drag the widget to the top of the Primary Widget Area. Next, drag a second copy of the Links widget from the Available Widgets area and into the Primary Widget area, this time to the bottom of the sidebar. Set that second widget to filter by yourother category.
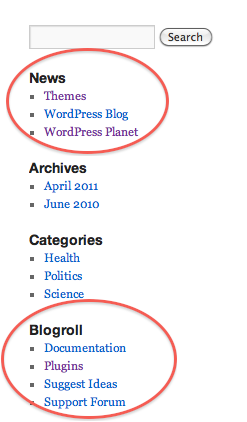
Again, refresh your site in the browser and take a look at the sidebar. You should now see links in one category at the top of the sidebar, and links from another category at the bottom.
Want to learn how to install a links list without a widget, e.g. on a separate page rather than in the sidebar? See the Page Hacks section of our Modifying WordPress Themes tutorial.
Add Media
![]()
There are many ways to add images, video, audio, or PDFs to posts or pages in WordPress. Media can either be uploaded directly to your site through the WordPress media manager, or hosted on an external site such as YouTube or Vimeo (for video) or Flickr or Picasa (for images).
I recommend hosting video on external services, for several reasons:
- Videos will probably be much larger than the max upload size allowed by your host.
- Video can be tricky to compress correctly (with a good size/quality ratio).
- Video can consume a lot of disk space to store and a lot of bandwidth to serve. Many hosts have quotas on these resources, and you can exhaust them quickly.
Images, however, should generally be uploaded directly to your site but there are some up-sides to using external services like Flickr. For example, these services make it easy to create sophisticated slideshows, and may help you capture additional “drive by” traffic from those sites.
I’ll cover direct uploads first, then the process of embedding externally hosted media.
On the right side of the Post field, there are a series of icons to Add Media to your post. Select the appropriate icon and follow the prompts to upload your content.
Adding an Image
Before you start uploading, place your cursor in the text of the Body field where you want the image to appear. This will save a bit of hassle later on.
Just above the formatting toolbar’s icons, look for row of small icons labeled “Upload/Insert.”

The first of these icons is for uploading images – click it.
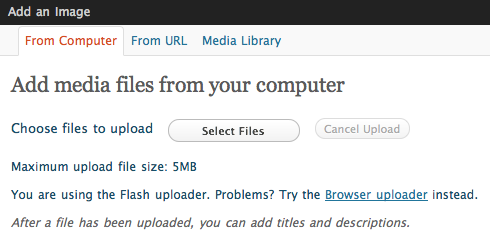
Click Select Files and navigate to the image file you want to upload (you can actually upload multiple files at once, but we’ll just work with one for now). Click OK, and you’ll be looking at something like this:
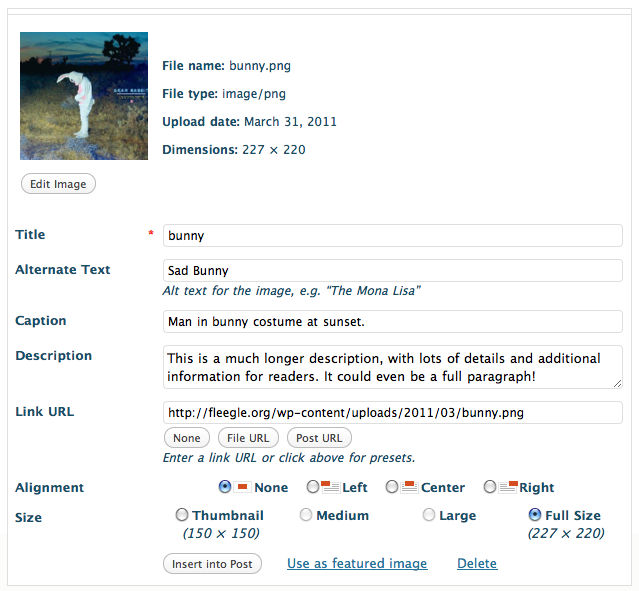
Take a moment to study this panel. There’s a lot you can do here!
Clicking the Edit button will reveal a sub-panel that lets you crop, scale, rotate, and otherwise manipulate the image itself (though we recommend doing this kind of image editing in Photoshop or iPhoto before uploading).
The Title, Caption, and Description fields are used in different ways by different templates and gallery plugins. You should use these as instructed by documentation or your webmaster.
The Alternate Text field is not displayed on the page, but is present in the HTML. This field is critical for handicapped users who have “screen readers” dictate the web page to them. The Alternate field is also used by search engines, so they have some sense of what the image is about. Remember, Google is the web’s largest blind user!
The Link URL field lets you control whether the user can click the image to go elsewhere, and if so, where. Set it to None to make the image not clickable. Setting it to File URL will cause the image to link to a full-size version of the same image in a raw browser window, without your site’s design/theme. Clicking Post URL will cause the link to go to an “Attachment page,” which is a special WordPress page that hosts a piece of media associated with a story. This is a good choice for showing larger versions of images without losing the “context” of the site.
The Alignment options are pretty straightforward – set this to None, Left, Right or Center to control whether or how text wraps around the image.*
* Note: For these alignment options to work properly, your theme’s CSS stylesheet will need to include the following rules. Your web developer can take care of this if your theme isn’t aligning images properly:
.aligncenter { display:block; margin-left:auto; margin-right:auto; }
.alignleft { display:block; margin-right:auto; }
.alignright { display:block; margin-left:auto; }
The Size option lets you control the dimensions of the inserted image. When you upload an image, WordPress makes some decisions about whether to also create additional versions of that same image for use in various contexts. If your uploaded image is larger than your theme’s content area width, or if you just want to show a small version, select the thumbnail or medium version, with the appropriate linking option as described above. To control the image sizes WordPress will generate, see Settings | Media | Image Sizes.
Finally, click Insert Into Post. The image will be inserted wherever the cursor was in the text when you began the upload process. If the image ends up in the wrong place for some reason, you can simply drag it to the right spot.
If you upload multiple images into a post, WordPress will give you the option to “Insert as Gallery.” If you take this option, your images will appear as a small gallery of thumbnails, each of which links to the full-sized image on a separate page. See our WordPress Galleries tutorial for more on this topic.
Re-Using Images
When you first clicked the Upload/Insert icon, you may have noticed three “tabs” across the top – From Computer, From URL, and Media Library. You may also see a “Gallery” tab up there. The Gallery tab, if present, gives you quick access to all images that have been previously added to the current post. The Media Library tab gives you access to everything that’s been uploaded to the entire site, ever! If you want to re-use an image you’ve used in the past, don’t re-upload it – just use these tabs to pull it back into your post.


WordPress will upload all your photos and automatically generate thumbnail images. When it’s finished, it will let you know everything uploaded successfully, as you can see here.

How to edit photo metadata
While it’s best to edit metadata in the actual images, if you don’t it can still be done in WordPress. Notice that one of the files uploaded with the name “Doc title” This is the information that was entered into the title field in Photoshop. If you didn’t edit the Title field in Photoshop, you will have to do it here to have a title that is pleasing to read.
Click to Show (the Doc title detail button) to take a closer look.

WordPress automatically pulled in the Title and Description fields but the caption is blank. WordPress galleries use the description field so this will do for now. Also, make sure to fill in theAlternate text. This describes the contents of the photo for blind users and will help Google better index your site. When you’re done editing your photos, click Save all changes.
Your photos in the Media Library
Saving will take you to the Media Library. The Media Library seems fine at first glance. Notice that when you hover your mouse over a thumbnail you have the option to edit or delete a photo. But if you use a lot of photos, this interface could become unmanageable very quickly. We’ll talk about solutions for that later.

For now take a look at the Attached to column. WordPress expects photos to be attached to posts or pages. Since we haven’t done that yet, all the photos are Unattached. Simply click the Attachbutton and select a post or page to change the status.
Why do we care? Native WordPress galleries use this to information to identify which pictures to show on a given post or page. Generally, it’s better to upload directly from a post or page.
wordpress: photo galleries
Add galleries to a post
Adding a simple gallery is easy in WordPress. Hopefully you are working on a development site and already know how to add a photo to a post. If not, check out the linked tutorials. It’s important that you have a development site to make mistakes while you figure out which settings you want to use.
Upload photos to a post gallery
Create a new post. Give it a title immediately and save a draft. I’m going to call mine WP gallery.
Click the Insert photo button above the post editor.

A new window will open that will allow you to select all of your photos and upload them like we did on the previous page. This time, when you click Save all changes, a new Gallery Settings section appears. Change the settings on the top half of the window to match the image below. Leave the Gallery Settings alone for now.

Now lets examine the Gallery Settings.
- Link thumbnails to: Image file opens the large image in a blank browser window.Attachment page opens the image in a new page that look like part of your site.
- Order images by: Choose Menu order to use the order created by dragging.
- Order: Changing from Ascending to Descending will reverse the order of your gallery.
- Gallery columns: Indicates the number of thumbnails in each row.
Adjust your settings to match the image above and click Insert gallery to return to the post. Savethe draft immediately.
Take a quick detour
If you look the Media Library, you will see that the images are all attached to the post WP gallery.

How the gallery appears in the post editor
Return to the post and make sure the editor is in Visual mode, you’ll see something that indicates a gallery has been inserted. It looks like this:

Now switch to HTML mode. You’ll see text that says
.

This is called a short code and is specific to WordPress. When you insert this code into a page or post, WordPress knows to make a gallery out of all the images attached to the post. Preview your post and it should look similar to this:

If you click a thumbnail image, the full image opens in a new, themed page.

Click the image for a larger version
Notice how your site’s furniture appears around the image. This means that if you have advertising in your header, you’ll get page views every time a photo is viewed. You can change the design by editing the templates and CSS.
Next we’ll add a plugin to customize our photo galleries.
NextGen Gallery Plugin
The NextGen Gallery plugin adds new photo management tools and slideshow options to your site. Additionally, there are several great plugins that work with it to give you more tools.
Download and install the plugin
Download and install the plugin directly from within WordPress dashboard as shown below. If your web server won’t allow you to do this, you will have to download the plugin manually and install it on your site via FTP. Make sure to activate it once it’s installed.

Note that there is a new button at the bottom of the menu on the left called Gallery. Click that to access Nextgen Gallery. In the overview you can see that you have no images, galleries or albums. The photos you just uploaded aren’t there because NextGen manages photos separately.
Add a new gallery and images
Click on Add Gallery / Images in the left sidebar. Find the Add a new gallery tab and create a new gallery called kittens. If your server allows it, NextGen will create a new folder in the wp-content folder named gallery. If not, you will get an error message and have to add the folder manually via FTP and try again. This is where your galleries will be stored from now on.
Once the kittens gallery is made, you will be given the option to upload images. Click Browse and select the same images we used previously. You also have the option of uploading a zip file or a folder of images. When the upload is done it should look like this.

Edit the new gallery
Just below the Add Gallery/Images button on the far left is a button labeled Manage Gallery. Click that and you’ll see a list of galleries. This is where Nextgen Gallery helps photo management. Not only are photos organized into galleries and albulm, but all of their metadata is searchable from the Search images field.

Click on the name of your gallery to edit it. This will open a window with a lot of options. Start by changing the title and description to something that makes sense. Then change the preview image. When you have done this, click Save changes.

Next, go down to the images and click the Sort gallery button to go to a new page.

Now click and drag the thumbnails to reorder the gallery. I’m going put the grey kitten first. ClickUpdate Sort Order when you’re done and then click the Back to gallery button.
Edit the new images
Notice that in addition to the title and description, the keywords field in the image file was imported into the tags field, adding another level of information. Edit those fields to make them useful.

When you mouse over an image you get additional buttons, just like in the media library. Click onedit thumb.

This opens a new window. Click and drag on the image on the left to redraw or edit the thumbnail image. Notice that the proportion is locked. You’ll learn how to change that when we edit the settings later on. Click Update when you are done.

Next to Edit thumb there’s a button called Meta. Click that to open a window that shows all the information that was imported from the image file. Additional fields include copyright, author, author title. All of this information is searchable from the main gallery page.

Make a gallery page
NextGen allows you to make a page directly from the gallery editor. No need to make a separate post. Make sure Main page is selected and click Add page.

Important! This publishes a page and makes it public, so do this last. You will end up with a page that looks like this.

When you click a thumbnail, the page will darken and the users can click through a slide show.

There is a setting that we’ll explore in the next section which sends the user to a page with a a click-through slideshow that automatically resizes to fit the content area and it reloads the page with each new click.

If you click on Show as slideshow you go to a new page where a slideshow plays automatically. It’s small at the moment but we can change that in the settings later on.

Now click edit. This should take you back to the Kittens are cute page you just made. You should see a short code that says [nggallery id=1]. The number is the unique ID that NextGen assigns every gallery. So if you want to switch a gallery in a post, change the id number. You can find the id number in the main Manage Gallery area.
TIP: If you want the slideshow to appear in a post instead of a page, simply add the short code to a post.
Edit the short code to use a template
Did you notice that the default slideshow doesn’t create new page views? Well, NextGen has a built in template we can use simply by adding a setting to the short code. Change [nggallery id=1] to [nggallery id=1 template=carousel].
This creates a click-through slideshow that automatically resizes to fit the content area. It also shows the side bar and reloads the page with each new click.

Next we’ll look at the NextGen options/settings.
NextGen settings
NextGen settings allow you to change many things about how slideshows work. Under the Gallerytab, look for the Options button. Notice that there are several tabs at the top of the window. Many of the settings are self-explanatory. We’re going to skip those and concentrate on the ones you really need.
General Options

Gallery Path: We set this up earlier. If you ever want to change where photos are stored, this is where you do it.
Delete image files: Should be on by default. If you want photos to be deleted manually, make sure it is unchecked.
Activate Permalinks: This creates permalinks for individual photos in a gallery. Off by default but worth turning on.
Activate Media RSS: Always good to give access to your content.
Activate PicLens/Cooliris: This lets you use some third part slide show tools but they can direct traffic away from your site. I recommend leaving it unchecked.
Thumbnails

The thumbnail settings give you control over the size and quality of every thumbnail that gets generated when new photos are loaded into a gallery. The Set fix dimension makes sure that all your thumbnails are identically sized.
Images

Resize images: Nextgen will automatically shrink photos proportionally to fit into your content area. For example, a vertical photo will shrink to a height of 450 pixels with the above settings.
Image quality: A high setting will ensure photos are not over compressed but means file size will be larger. Experiment to see which setting works best for you.
Back up original images: If you plan on keeping an archive of your photos offline (and you should), you can leave this setting unchecked.
Automatically resize: Unchecked by default. Must be checked for resizing to work.
Cache single pictures: This creates a cache for WordPress so that it can build pages faster. Not essential for small sites but can really help as you grow. Check this box.
Gallery

The gallery settings are very powerful but it’s important to know that many of the settings only apply to new galleries made after changes have been saved. This prevents unwanted changes in pre-existing galleries.
Deactivate Gallery Page link: Applies only to albums
Integrate slideshow: This is checked by default and provides a link at the top of the gallery to view the auto-scrolling slide show we saw earlier. You can edit the link text in the provided fields.
Unchecking the box provides a click through slideshow called the ImageBrowser (shown below) when a user clicks a thumbnail. It automatically resizes to fit the content area and shows the side bar for additional ad placement and it reloads the page for each new click.
Show first: If you choose to turn on the Integrated slideshow, you can choose whether you want to show a slideshow or thumbnail gallery first.
Show ImageBrowser: Checking this will overwrite any effects you have selected on the next tab and replace the effect with the ImageBrowser.
Sort options: This sets the default sorting options for galleries. You can change the order of individual galleries without affecting the defaults.
Effects

The two default effects can change the look of your slideshows. When a user click on a thumbnail image the see these effects instead of the ImageBrowser. Users can click through but page views are not refreshed. Both filters will display the description text. For these to work, the Show ImageBrowser gallery setting must be unchecked. Pick one from the dropdown list.
Shutter

Thickbox

Watermark

You can set a default image or text watermark for your photos to protect your copyright. The watermarks are turned on/off on individual galleries and cannot be undone because they permanently alter the image.
Slideshow

The slideshow options are pretty self-explanitory. Just be careful not to get carried away with the transitions. There are addition setting on this pane but the defaults should work just fine.
Now lets look at some plugins that work with NextGen to provide additional functionality.
Nextgen Smooth Gallery
One way of improving the look of your galleries with a minimum of fuss is to add the NextGen Smooth Gallery plugin. It uses short codes similar to Nextgen. Once it’s installed create a new post, give it a title and save. Then enter the [smooth=id:1;] short code in the HTML view. It will create a gallery that looks like this:

Adjusting the settings is much easier than in Nextgen. Installing a plugin creates a new settings tab called Gallery (Smooth) in the left sidebar. Let’s take a look.
General Options

Width and Height: Sets the slideshow size.
Timed: Check to make the slides auto play. Delay is in milliseconds so the default of 5000 is actually five seconds.
Show Arrows: Places arrows on the left and right sides of the image so the user can click through.
Show Info Pane: Displays the Title and Description fields at the bottom of the image.
Show Carousel: Turn on/off the scrolling thumbnail images.
Carousel Options – Text: Changes the text in the tab below the thumbnails. Feel free to change it to something like SCROLL IMAGES.
Carousel Options – Text: Unchecking hides the thumbnails when the slideshow first loads but leaves a tab showing as seen here:

Embed Links: Allows link in a Title or Description field to open in the same page. If you have iFrame checked, the page will replace the slideshow in the iFrame.
iFrames: This helps Smooth Gallery play nice with other JavaScript libraries. Make sure this is checked if you do not plan on using links in your captions.
Specific Options
Below General Options in the side bar there is another button labeled Specific options. This lets you have individual galleries that are different from your defaults.

All the settings are the same but when you click the Generate Code button you get detailed short code that you can copy and paste into a post.

More features are planned in upcoming versions so be sure to read the latest documentation on theWordPreass plugin page.
How to Add Authors’ Images to your WordPress Blog
How to create additional image sizes in WordPress
How to create a photo album gallery in WordPress
Better image management with WordPress
How to Get Perfect Blog Images
Embedding External Media
Many sites, such as YouTube and Vimeo, let you embed content into other sites (such as into your blog). This is also true of Google Maps and Charts, video services, widget providers, and more. Look for the “Embed” option on those sites. Here’s what it looks like on YouTube:
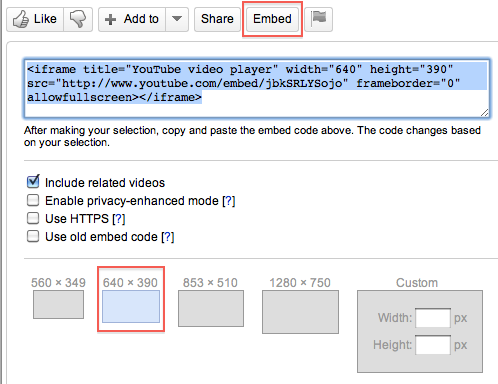
After clicking the Embed option, YouTube gives you a bunch of options. The most important one to notice is the Size selector. You should select the size that most closely matches the width of the content area in your site’s theme. For example, if your site’s content area is 700px wide, select the option that’s 640px wide. Notice that you can also embed the content at custom dimensions.
Copy the embed code provided to your clipboard, return to your Post, and switch to HTML mode. This is critical – you cannot paste raw HTML into the editor when in Visual mode.
In addition, there is a potential limitation – only users who have the role of Administrator on the WordPress site can post embed code without having it stripped out.
If you are not an administrator and/or don’t want to use HTML mode, there is an alternative for users of WordPress 3.1 and higher. Go to the Settings section of the Dashboard and enable theAuto-embeds option. Set a maximum width and height at which you want embedded media to appear.

Now, returning to the example YouTube video, don’t grab the embed code. Instead, copy theURL of the page hosting the video to your clipboard:

Back in the WordPress post editor, paste the URL on a line by itself, directly into the body of the post. You do not need to be an administrator, and you do not need to be in HTML mode for this to work. If the service you pasted the URL from is a cooperating “oembed” provider, the media embedding will be taken care of for you, automatically. A list of supported providers can be seen here.
Notice that this technique does not work with Google Maps or Charts.
Flickr Slideshows
To embed a Flickr slideshow, try this: On Flickr.com, go to any Set, Album, or Photostream, and click the Slideshow button. Once in the slideshow, click the Share link at the top right.
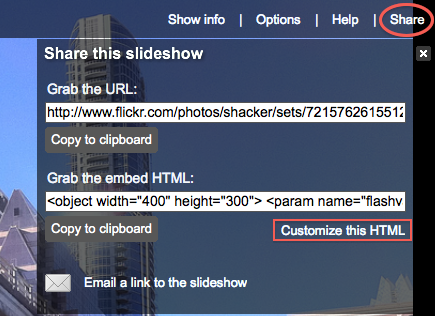
At this point, you can copy the code provided in the embed field, but notice that it defaults to 400px wide, which is probably not wide enough. Instead, click the Customize link and you’ll be taken to a new page where you can enter a custom width and grab updated embed code for posting.
USERS AND USER TYPES
The user account that you created when you installed WordPress is an admin account, and so has permission to change or edit any settings or content in the site. If other people will be contributing to the site, you should consider what level of user you will allow them to be. These are the basic user types (click the links for more details):
- Super Admin – Someone with access to the blog network administration features controlling the entire network (See Create a Network). This only applies if you have a network of WordPress sites.
- Administrator – Somebody who has access to all the administration features
- Editor – Somebody who can publish and manage posts and pages as well as manage other users’ posts, etc.
- Author – Somebody who can publish and manage their own posts
- Contributor – Somebody who can write and manage their posts but not publish them
- Subscriber – Somebody who can only manage their profile
WordPress Admin Panel
Permalinks
It’s important that your URLs are not just machine-readable, but human-readable as well. A URL like:
Does not tell the reader where in the site hierarchy they are, nor what date it was written on. And it doesn’t give search engines any keywords to help in the indexing process. These URLs, however, are meaningful both to search engines and to humans:
http://example.com/about/products
http://example.com/2011/05/18/plasma-tvs-compared
But web servers need to give a hint called a Rewrite Rule to WordPress so it can translate those friendly URLs into database IDs, so the right content can be served up. For most purposes, I recommend the Day and Name URL structure.
You can also set a different URL base for category view, so that, for example, your photography category has the URL:
http://example.com/topics/photography
When you click the Save Changes button, WordPress will attempt to write to a special file called.htaccess on your server and you’ll be all set. If WordPress doesn’t have permission to write to the directory on the server, it will give you a block of code instead. You’ll need to log into your server’s file system and create a file called .htaccess, then paste this code into that block.
ADDING CONTENT
When adding content, you have to decide if it should be a post or a page. The main difference between these is that a page is non-dated content that is intended to be a permanent, top-level part of your site that does not change often. A post is for dated, time-sensitive content, that you will add on a regular basis to freshen the site. Posts are usually the bulk of the site, with pages providing context and background information. On this site, the weekly lessons are posts and the syllabus is a page.
Creating Pages and Posts
CREATING PAGES
Pages are relatively simple. They have the following elements:
- Title
- Content
- Publish Status
- Page Attributes – Template and Parent
- Featured Image
CREATING POSTS
Posts have most of the same elements as pages with some additions. They do not have parents.
Categories – You can use these to organize your posts. Categories can be added right from the post page or from the Categories item in the left side dashboard menu.
Tags – Tags are a looser way of associating posts with a list of keywords that describe the content of a post. Some themes will show all the tags on a post as hyperlinks, so you can quickly jump to other posts tagged with the same term.
HOMEWORK | Week 6
- Update your Google Calendar, adding deliverables deadlines for resume, portfolio, contact, skills, artist statement, images and home page and share this with your client. This should be your last push to receive content from your “client”.
-
- Your “client” should sign off on your site map by the end of the day on WEDNESDAY. Put your REVISED site map up on your blog.
- All prep for images including color corrections and/or contrast corrections AND image resizing should be completed by SUNDAY.
- Give them a drop dead deadline and do not accept any content after SATURDAY. Sort your content by page and put the text/images/video in the correlating folders on your DropBox. Take a screenshot of your DropBox folder and upload it to your blog.
- Make a list of missing or needed items by THURSDAY and relay the information to your client. Take a screenshot of your missing items listed and upload it to your blog.
- All wireframes should be completed and uploaded to your blog.
- Your theme should be installed along with the suggested plugins. You may add any additional plugins that you deem necessary.
- Add widgets to your sidebars.
- All menus, including sub nav and sidebars should be completed.
- Your “client” CONTACT and RESUME pages should be completed.
- On week 7 give me the URL to your blog, your client’s URL where the WordPress site is located and your Delicious account..
- On your del.icio.us account tag three Web Sites that focus on WordPress, WordPress widgets, WordPress plugins or anything we learned in class today, and write a note in the Delicious comments section about why you think each one would be a good resource for this class. ALSO, add week 6, etc. in your comments section so that I can keep track of your comments. *Make sure you also add the tag: msuinteractivemedia AS WELL AS add additional tags.

Recent Comments