
Week 1: Intro to Interactive Multimedia Design
“Creativity is just connecting things. When you ask creative people how they did something, they feel a little guilty because they didn’t really do it, they just saw something. It seemed obvious to them after a while. That’s because they were able to connect experiences they’ve had and synthesize new things. And the reason they were able to do that was that they’ve had more experiences or they have thought more about their experiences than other people. Unfortunately, that’s too rare a commodity.
A lot of people in our industry haven’t had very diverse experiences. They don’t have enough dots to connect, and they end up with very linear solutions, without a broad perspective on the problem. The broader one’s understanding of the human experience, the better designs we will have.”
-Steve Jobs 1996
Week 1 Overview | January 22nd
- Review Syllabus
- Introduction to Studio
- Class Blog
- Personal Blog
- Student Questionnaire
- Deli.cio.us
- Flickr
- Best Practice for File Naming
- Moving Files to Multiple Places
- Application Output
- File Management
- Best Practices for File Storage
- Saving Images
- PSD vs JPG vs GIF vs PNG
- Image Size
- Save and Export
- MSU File Storage Space
- Introduction to Interactive Media
- UX Design
- UI Design
- HTML Review
- Site Map
Project 1: Responsive Design – Site Map, Wire Frames, Style Frames
Lab Rules
- Please do NOT touch the computer screens. They aren’t touch screens!
- Please do NOT eat or dring at the computers.
- Please shut down your programs and the computer at the end of class.
- Push your chair under the desk and clean off the desk area.
- You are required to use the desktop computers. Bring a flash drive to back up your work.
Create a gravatar.
This is the class blog. All lessons, homework, readings, and resources for the class will be posted through this blog. All of you will be required to register on the blog, and I will use the email address that you sign up with to communicate with you outside of the class. I will also place comments to your work on this blog. Please review my comments each week. Take note of the address now!
You will be required to log into the class blog each class. Please create a gravatar so that your image will be posted with each of your comments. Use Photobooth on your Mac to take a current photograph of yourself and use that photo to create your gravatar.
You will post all homework on your personal blog. This is a blog you create specifically for this class. For your blog address as well as your username, use your full name. Example, johnbrown.wordpress.com. It’s as easy as that! Please take note of the address now!
You will be required to post all your homeword on your personal blog before the start of each class. When you log into the CLASS BLOG for each class, write the url of your homework that you created on your PERSONAL BLOG.
Go to WordPress and create your blog.
Fill out the
Del.icio.us is a social bookmarking service that everyone is required to sign up for an account for an maintain tags on it. Through del.icio.us you are going to “tag” pages related to our work in the class so that you can reference them later and share them with the class. It is a way to keep all your tagged pages in an orderly manner making it very easy for you to find your tagged pages. We will be using Del.icio.us to tag sites related to this class including tutorials, design inspirations, lectures and other articles.
Tag your del.icio.us postings with the following tag:
msuinteractivemedia
Sign up for an account here: http://del.icio.us/
Flickr
Each week you will be posting ALL your in-class and homework to BOTH your personal blog and to Flickr. Tag your Flickr postings with the following tag: MSU_Interactive_Media_Spring_2013.
Sign up for an account here: Flickr
Best Practices for File Naming
Accurate file-naming – Special characters – Underscore – Date
YYYY_MM_DD _FileName_Version
Read more about file-name convention for digital files.
Moving Files to Multiple Places
A how to on moving large files:
- Back up your files to multiple storage spaces
- How to Compress (Zip) Files and Folders
- Sending files under 100mb: Transferbigfiles.com
You will be required to turn in ALL your native files (PSD, AI, SWF) on a dvd at the end of the semester. Make sure you backup all your work!
Each program has their own proprietary file formats. They’re referred to as raw or source files, as they represent the raw materials used for producing your finished products. In Illustrator, the default raw format is the AI format. AI stands for Adobe Illustrator. From the AI file, you can export to many of the above-mentioned graphic formats. Photoshop’s raw-application file format is the PSD file and InDesign is the INDD. All of these files contain information about your projects including vector points, layers, and effects. Raw files vary in size depending upon the objects within and the complexity of the project. PSD files are much, much larger that AI files. Raw files are not web friendly, meaning that you cannot display these formats on the Web. They are proprietary formats and can only used in the applications you created them with.
Proper file management is imperative to storing and retrieving your digital work. Organization is crucial in design because when you move your files around, the program losing the links you created inside your projects and will not print correctly without those links.
Here’s a good link to a file management workflow.
There isn’t one set work flow for organizing your files. Ultimately, you should come up with a scheme that works for you. Some possible methods of organization include the following: by project, by date, by project name, by client.
Versions
Just as saving a file is important, adding a version number to the file name is also important. Resave after each major change to a project with a new version number. Just take the current filename and add a number extension. I use project name_date_version. Example: StarlightTrifold_2012.10.1_v1. With each new version, I increase the number.
Connect to your MSU web space now.
MSU offers each students 500 megs of online storage space. PLEASE back up all your work in this class to your storage space. Do not depend solely on this for backup but consider it as one more way to ensure that your work has been backed up.
Below are step by step instructions on how you can access your storage space. Using a MAC computer:
- From your desktop click on GO and in the drop down menu, click on CONNECT TO SERVER.
- Type in one of the two urls below:
Personal (Home) File Share https://msuwebdav.montclair.edu/students_vol1/ <NetID>
Web Publishing File Share https://msuwebdav.montclair.edu/pubweb_vol1/ <NetID>
- Type in one of the Directory Addresses from above in the Server Address: field
- Click the +
- Click Connect
- Type your <NetID> User name and Password
- Click Connect
View the MSU pdf with more details.
To access your space from a personal computer or the lab computer, read this.
******NOTE: ALWAYS BRING A BACK UP OF ALL YOUR FILES IN TO CLASS ON A FLASH DRIVE. ALSO, PLEASE BRING IN HEADPHONES TO EACH CLASS SO THAT YOU CAN REVIEW VIDEOS WHILE DOING IN-CLASS ASSIGNMENTS.*******
Once you’ve finished manipulating your images, you’ll need to save them. There are two ways I recommend saving images. First, save a copy of the image that retains the individual layers. It doesn’t matter if your working in Photoshop or Illustrator, save the PSD or AI files first, then resize for the web.
AFTER you’ve saved the PSD files, you can flatten the image and resave for the web. Once you flatten the image, the individual layers will no longer be available. All of the layers will be flattened into one layer. This will prevent you from manipulating any of the data. For example you will no longer be able to move the text around.
If you want to use your image on the Web, you need to flatten the image so that it consists of only one layer which consists of all the data from each of the layers. You need to flatten the image first, and save a copy of your image as a .jpg, .gif or .png file.
Step 1: Go to the Layer menu and select Flatten Image.
Step 2: Go to File, Save As and save the image as a JPG or whatever format you choose.
PSD
Save your images at 300 dpi at 8.5×11 images and the color mode is CMYK for print usage. That is your MASTER file. You can then reopen the file, flatten the layers, change the color mode to RGB for the web at 72 dpi and the exact pixel size that your going to use on the web. PSD files will NOT show up on the web. You need to save it as a .jpg, .gif or .png for the web.
PSD preserves all the layers in your file. You should ALWAYS save a copy of your image as a PSD. Once you’ve done that, then consider which file format below best fits your needs.
Image File Formats: There are three primary image file formats used for graphics viewed on the web. Each of these file types were designed for the purpose of compressing memory usage. Each file type does this a different way.
Jpeg
Jpegs work well on photographs, naturalistic artwork, and similar material; not so well on lettering, simple cartoons, or line drawings. JPEG is “lossy,” meaning that the decompressed image isn’t quite the same as the one you started with. (There are lossless image compression algorithms, but JPEG achieves much greater compression than is possible with lossless methods.) JPEG is designed to exploit known limitations of the human eye, notably the fact that small color changes are perceived less accurately than small changes in brightness.
Gif
Graphics Interchange Format. A format used for displaying bitmap images on World Wide Web pages, usually called a “gif” because .gif is the filename extension. These files use “lossless” compression and can have up to 256 colors.
Png-8 and Png-24
PNG is a compression scheme that has two main benefits: it is a lossless compression image format and it holds alpha channel information. Originally, the Portable Network Graphics (PNG) format was designed as a royalty-free format, which would replace GIF and JPEG. Png-24 allows for smooth blending between alpha and opaque.
When speaking about image size on the web, there are three possible interpretations of this that you must take into account.
File Size refers to the amount of disk space an image occupies (in KB or MB)
Image Dimensions refers to the physical size of the image, expressed in height and width.
Resolution refers the pixel density of an image. This is expressed in pixels per inch (ppi). Images are displayed on the web at 72 dpi. Printed images are generally of higher resolution.
Compression
Compression shrinks down the file size of the photo so that it loads on the user’s computer quickly, but maintains a certain level of quality.
Saving
Click the Save button to save your image. ALWAYS ave your original photo for archiving, or if you intend to reopen it later PRIOR to using the save for web.
There are two ways of saving a photo in Photoshop. The first is to use the Save As… dialogue, the other is called Save for Web & Devices… which is used to save your photos in preparation for publication to the Web.
1) Save as: I recommend saving the file type as a Photoshop or .PSD file, which will also save extra Photoshop-specific information about your photo and allows you to go back to the file at a later date and manipulate all layers. You will not lose any quality when you re-save it multiple times. Saving as a .jpg, .png or .gif compresses the photo allowing you to use it on the web.
2) Save for Web: Use this when you are ready to export your photo for publication to the Web. The Save for Web allows you to see how your photo will appear once it’s published to a Web site. Optimized will show you how your photo will appear once it’s published on a Web site, and 2-up/4-up will show you comparisons so you can see how the different levels of compression will affect your photo when saving. These are automated ways to save your image for the Web.
Introduction to Interactive Multimedia Design
If your artistically inclined and technologically adept and interested in all aspects of digital media, then this is the class for you. You will acquire the tools you need to take an idea or a problem and advance it through the entire process from concept to pre-production, production and post-production. The aim of this class is to produce interactive multimedia designers who are skilled on three main themes, design, practical multimedia development and technical underpinning. You’ll learn current and emerging concepts, practices, tools and technologies relevant to the design and production of interactive multimedia. We’ll focus of the relationships between design and information technology principles and practices that are core to today’s growing multimedia, web and new media industries.
Some of the tasks you’ll accomplish include:
- Develop a client brief
- Prepare rough design concepts including site maps, wireframes and styleframes
- Use industry-standard graphics and multimedia software packages
- Produce visuals for web and mobile application
- Design hypertext links, rollover and animated menus
- Write basic code
- Record, edit and publish digital audio
- Design and code animated gifs
- Design interactive images
What is Interactive multimedia? Technology that requires certain input from the user in order to deliver a set of information through words, graphics, images, or videos. The interactivity occurs when a user types in certain text or clicks a certain button. The underlying purpose is to create rich interactive experiences.
WEB DESIGN REVIEW
RESOURCE
I’m going to be referring to it a lot this class regarding HTML/CSS and all things Web related. If you are ever stuck for how to do something, start here:
http://w3schools.com
Intro to HTML
HTML is the language of Web browsers. HTML stands for HyperText Markup Language. HTML is a markup language – a way of marking up plain text documents so that Web browsers know which parts of a page are paragraphs, which parts are bold or italic, etc. It is constantly undergoing revision and evolution to meet the demands and requirements of the growing Internet audience under the direction of theW3Schools, the organization charged with designing and maintaining the language.
HyperText is the method by which you move around on the web. Clicking on specially coded text called hyperlinks navigates you to other pages. The term hyper indicates that the hierarchy of the pages is not linear — i.e. you can go to any place on the Internet whenever you want by clicking on links — there is no set order to do things in. Markup refers to HTML “does”.
What You Need to Get Started
To take your website live you’ll need a web host provider and a domain name. Bluehost, GoDaddy and Hostmonster are just a few. I highly recommend BLUEHOST. Their control panel is very easy to use and understand. Their $4.95/month price is extremely reasonable, they give you a free domain registration and have a money back guarantee.
You are NOT required to sign up for a website host provider. You may use the MSU hosting space but note, once you leave MSU, the web space will no longer be live.
Creating your own HTML pages with Text Editors
To make your own Web pages, start with the code above. HTML pages can be created in any Plain Text Editing application. DO NOT use Microsoft Word, as it will add extra formatting that will break your code. Here are links to several text editors that you can download and use to create your pages:
Uploading Your Files to the Web Using FTP/SFTP
Your html files are uploaded to the Web server using FTP, or File Transfer Protocol. You will need an FTP client to do this. If you are using the A server, you will need a program that supports SFTP, or Secure File Transfer Protocol. Here are likes to some popular programs:
Fugu (MAC) – This program is free.
Fetch (MAC)
CyberDuck (MAC) – This program is free.
FileZilla (PC) – This program is free.
All these programs function essentially the same. To connect to your remote server, you enter the address of the FTP server, your username and password.
Setting Up Your Workspace
All your HTML documents and media files live together under a single folder (or in sub-folders of a parent “site” folder) on your Web hosting space. Duplicate this folder on your desktop/flash drive. You’ll create a “source” folder for files and documents you use to create your site. This is where you will place all of the files that make up your page or site.
HTML Syntax
All HTML syntax is composed of discreet pieces of code called elements. Elements are made up of paired opening and closing tags.
Tags
Each tag has a specific meaning that communicates to the browse what it should do with the content between the opening and closing tag. For example, the <b></b> tag tells the browser to make bold all text contained between its opening and closing tags.
Tags are the cornerstone of HTML. Tags are instructions to the Web browser that dictate the display of text, images and other elements on the page and are not visible when the page is displayed to the user. You can recognize an HTML tag because it appears in between greater than and less than signs:
<tagname>
Tags have opening and closing brackets. Example, to make text bold, you would write the following:
<b> </b>
Any text between the carrots will appear bold on the web.
Starting an HTML Document
In order for a Web browser to recognize a file as an HTML document, it must contain the proper structure. At the minimum, it must contain five basic tags. These tags must appear in the correct order. The page structure tags are as follows:
DOCTYPE tells the Web browser which HTML or XHTML standard your document is written to. This is the first thing that should appear in any HTML document that you write.
<!DOCTYPE html>

<html>

<head>
<title>Title of the document</title>
</head>
<body>
The content of the document…… Anything that appears between the body opening and closing tag will appear on your Web site.
</body>

</html>
Always use the code exactly as it appears above. The <html> tag comes next. It encloses all other tags and content on the page, and further serves to instruct the browser that what is being rendered on the rest of the page.
Third is the <head> tag which contains information that is not displayed in the browser window. For instance, a head tag may include information that search engines may use to find the page.
The <title> tag contains the text that appears in the title bar of the browser window. It is nested within the head tag.
The <body> tag contains all of the information to be displayed by the browser.
File Naming Conventions and Index.html
There are a few rules that govern the naming of web files and directories:
All Web page files must end with .html or .htm. These extensions are interchangable, but generally we use .html
Names are case sensitive. This means that Bio.html and bio.html will be considered by the server as two different files.
Spaces and non-alphanumeric characters are not allowed, with the exception of underscore (_) and hyphen (-)
The “home” page of a Web site is always called index.html or index.htm. If this file does not exist, you will either get an error or see a directory listing of the root directory, depending on how the Web server is configured.
Use all lowercase letters, and to use underscores instead of spaces:
my_name.html
Documents Must Have a Logical Structure
Logical Markup Example (Using semantic markup to describe content.)
<!DOCTYPE html>
<html>
<head>
<title>Working with Structure</title>
</head>
<body>
<h1>Welcome</h1>
<p>Welcome to the site where structure matters!</p>
<h2>Getting Into Structure</h2>
<p>In order to begin working with structure, you need to be aware
of:</p>
<ul>
<li>DOCTYPE declarations</li>
<li>Properly structured head and body components</li>
<li>Logical structures for content markup</li>
</ul>
</body>
</html>
Viewing the Document Tree
When you have a more semantic document, you can easily visualize it via the document tree, which is a map that reflects where elements go within the structural hierarchy of the document. This tree becomes critically important when using CSS because of the concept of inheritance.

Document root: html
- head & body are children to the root
- title is child to the parent head
- h1 , h2, p, ul all children of body
- Each li is a child to ul
-
ELEMENTS MUST BE PROPERLY NESTED
In HTML some elements can be improperly nested within each other like this:
<strong><em>This text is bold and italic</strong></em>In XHTML all elements must be properly nested within each other like this:
<strong><em>This text is bold and italic</em></strong>
TAG NAMES MUST BE IN LOWER CASE
This is because XHTML documents are XML applications. XML is case-sensitive. Tags like <p> and <P> are interpreted as different tags.
This is wrong:
<BODY>

<P>This is a paragraph</P>
</BODY>
This is correct:
<body>

<p>This is a paragraph</p>

</body>
ALL XHTML ELEMENTS MUST BE CLOSED
Non-empty elements must have an end tag.
This is wrong:
<p>This is a paragraph
This is correct:
<p>This is a paragraph</p>
Empty Elements Must also Be Closed
Empty elements must either have an end tag or the start tag must end with />.
This is wrong:
This is a break<br>
This is correct:
This is a break<br />
IMPORTANT Compatibility Note:
To make your XHTML compatible with today’s browsers, you should add an extra
space before the “/” symbol like this: <br />.
THE <!DOCTYPE> IS MANDATORY
An XHTML document consists of three main parts:
- the DOCTYPE
- the Head
- the Body
Basic Tags
The most commonly used tags.
There are two types of HTML formatting tags: inline and block level tags. These two types have slightly different behaviors.
Inline tags
These tags are designed to enclose content that is part of another element. Generally they are used when you want to affect just part of the text in a paragraph. There are just two inline tags we are going to talk about today.
Bold text:
<strong></strong> or <b></b>
Italic text:
<em></em> or <i></i>
Line breaks:
This is a self-closing (non-container) tag. This will create a single line break wherever it is placed in the code:
<br />
Block level tags
These tags are used to control blocks of content. The main characteristic that differentiates block from inline is that block level elements appear by default with a line break before and after them. Here are the most common block level tags you will work with:
The six heading levels:
<h1>Heading 1</h1>
<h2>Heading 2</h2>
<H3>HEADING 3</H3>
<h4>Heading 4</h1>
<h5>Heading 5</h1>
<h6>Heading 6</h1>
Text and HTML
P Tag: You insert normal text by using the paragraph tag:
<p>This is a paragraph. You can include as many sentences as you want.</p> The paragraph tag automatically creates an empty line above and below itself.
Emphasizing text: Use the <b> and <i> tags. <b> makes text stand out as bold by default, and <i> italicizes text. You can use these tags within a paragraph. Example:
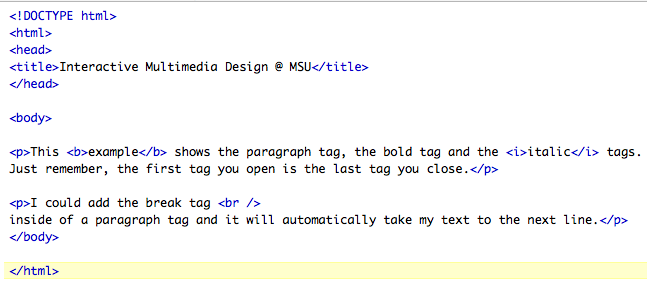
You can write as many inline tags as you’d like. There’s no limit.
You could also add the break tag: <br />, one of the few tags that does NOT have an open and close tag. The break tag tells the line to break and go to the next line WITHOUT adding a space. Remember, a paragraph tag automatically adds a blank line before and after it. A break tag does not.
To the left is how the code would look when writing it using Text Wrangler.
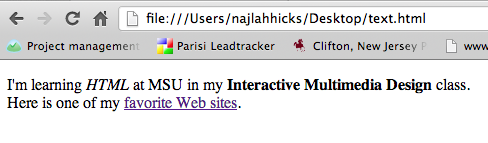
Below is how it would appear on the Web. Remember, you have to save the page, then using FTP software, you would transfer the page to your Web hosting space.

CREATING LINKS
Links allow the user to navigate from one Web site to another. HTML links are created by using the “anchor” tag, represented by <a/>. A hyperlink/anchor tag looks like this:
|
1
|
|
Always put double quote marks around all attribute values, and always close your link with <a/>. Remember, you open a link, you close a link. Note, you must include the full URL when linking to an external site .
Tip:
Always copy/paste URLs into your links, rather than trying to type them by hand. This will prevent broken links.
Let’s use Google at http://www.google.com as an example and use “Check out Google” as the linkable text. Type:
|
|
Your HTML document should look like this:
|
1
2
3
4
5
6
7
8
9
10
11
12
13
14
15
|
<!DOCTYPE html><html> <head> <title>My First HTML Page</title> </head> <p> I'm learning <i>HTML</i> at MSU in my <b>Interactive Multimedia Design</b>class.<br /> </p> </body></html> |
This is how it would look on the Web.
Linking to Another Page on the Same Site
Links can point either to external sites, or to other pages on your own website.
Link to another page on your same site: You don’t need to write the full http://domain.com. You simply refer to the destination page by filename. On you site you had another page called contact.html and you wanted to link to from your resume Web page you would type:
<a href="contact.html">Contact me</a> |
EMAIL LINK
To link to an email address, which will spawn the user’s designated email client, you simply need to add the “mailto” parameter:
<a href="mailto:emailaddress@server.com">Email me now.</a>
LINK TARGETS
Unless instructed otherwise, a Web browser will open a target document in the same window as the linking document. The user of the “target” attribute allows you to direct the target document to an alternate window.
TARGET ATTRIBUTE VALUES
_blank Opens the linked document in a new window
_self Opens the linked document in the same frame as the link
_parent Opens the linked document in the parent frameset
_top Opens the linked document in the main browser window, replacing all frames
name Opens the linked document in the window with the specified name
Common Link Types
Link to launch a New Window
<a href=”contact.html” target=”_blank”>
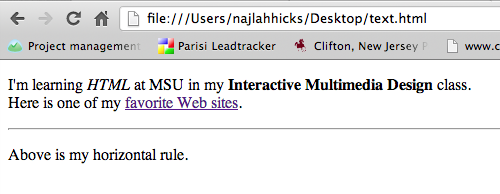
HORIZONTAL RULES
<hr /> |
This adds a horizontal line to the page. Since <hr /> is a block-level element, it will break any text preceding it to a line above, and any text after it to a line below. Just like the break tag <br />, the horizontal rule tag does NOT have opening and closing tags. To add a horizontal rule we’re going to add just new line just below the hyperlink. Type in <hr />.
Your page should now look like this:
INSERTING IMAGES
Images are inserted into a page by using the img tag with the src attribute, like this:
<img src="picture.jpg"> |
The image you specified will appear in the browser where ever you type the code above. The image file should be stored in the same folder as the Web page you are creating, or in a subfolder called “images.”
Image spacing and alignment
You can align things to the left or right by using align=”left/right” attribute like I’ve written below. This will make the image float to the left of to the right and the text will wrap around it like I’ve done on this page.
<img src="image.jpg" align="left" /> |
Note: Images can’t be “read” by search engines so you need to give images an attribute for “alternative text.” Notice when you mouse over an image in Safari that a small text appears. This is an image’s “alt text.”
In your img tag, add it like this:
<img src="montclair.jpg" … alt="Montclair State University"> |
LISTS
There are several tags that you can use to create a “list” of items which is a very important way of organizing content. When used in combination with CSS, lists are a great way to create navigation menus. The tags below are a little different than the tags above in that you must use two distinct tags to create the list, one that contains the entire list, and one that contains each item in the list. Let’s look at
There are three types of lists: unordered, ordered, and definition.
Unordered List: This tag, enclosing all list content, creates a bulleted list.
<ul></ul>

NOTE: Inside the <ul> or <ol> tages, you use a set of tags, enclosing each line, or “list item” item:
<li></li>
Unordered List
This is how it would look on the web.

This is how it would look written in Text Wrangler.

This is the code you would use:
<p>This is an example of an unordered list.</p>
<ul>
<li>Unordered information</li>
<li>Ordered information</li>
<li>Definition lists</li>
</ul>
This tag, enclosing all list content, creates a numbered list:
<ol></ol>
To make an ordered list, like this:
- Monday
- Tuesday
- Wednesday
- Thursday
- Friday
Use this code:
<ol><li>Monday</li><li>Tuesday</li><li>Wednesday</li><li>Thursday</li><li>Friday</li></ol>
Definition List
This tag involves a main phrase, and then a definition for that phrase that appears indented and appearing on a separate line.


Use this code:
<dl>
<dt>This names an item</dt>
<dd>This defines the item names</dd>
<dt>This names another item</dt>
<dd>This defines the other item named</dd>
</dl>
To create an unordered list, like this:Use this code:
<ul>
<li>Unordered information</li>
<li>Ordered information</li>
<li>Definition lists</li>
</ul>
RESOURCES:
Practice, practice, practice and practice some more. That’s the only way your ever going to fully understand HTML. You can do that at W3Schools.org. You can also learn more at Knight Digital Media Center.
SPECIAL CHARACTERS AND NON-BREAKING SPACES
Text characters that are outside the normal ASCII character set must be represented in html via special character codes. This includes things like em dashes, curly quotes, ampersands, etc. These special character codes always begin with an ampersand (&) and end with a semi-colon(;). For example, an em dash (—), would be represented in your code like this:
—
or
—
One especially useful special character is the non-breaking space:
Put this character in your code when you want to have more than one white space in a row. However, do not use it to create indented or tabbed formatting, we’ll learn how to do that later!
RESOURCE:
For a full list of character codes, visit Special Characters Reference.
Here’s a great resource for common HTML tags: Webmonkey’s HTML Cheat Sheet
LINKING FILES
File linking is done through the use of the <a> or anchor tag.
Use the following syntax for linking to another document:
<a href="URL_of_target_document">link_text</a>
For example, if you were to link to Google, you would use the following code:
<a href="http://www.google.com/">Google</a>
Email Address Link: To link to an email address, which will spawn the user’s designated email client, you simply need to add the “mailto” parameter:
<a href="mailto:emailaddress@server.com">email_text</a>
Link Targets
Unless instructed otherwise, a Web browser will open a target document in the same window as the linking document. The user of the “target” attribute allows you to direct the target document to an alternate window.
Target Attribute Values
_blank Opens the linked document in a new window
_self Opens the linked document in the same frame as the link
_parent Opens the linked document in the parent frameset
_top Opens the linked document in the main browser window, replacing all frames
Common Link Types
Link to launch a New Window: <a href=”newpage.html” target=”_blank”>
Link to launch email application: <a href=”mailto:myname@email.com”>
WEB DEVELOPER ADD-ONS
There is an excellent suite of Firefox and Google Chrome add-ons that will help you in your site development. I highly recommend that you install them on your home machine:
As the course goes on, we are going to learn to use the various tools included in the suite.
VALIDATING YOUR CODE
It is essential to make sure that you are writing valid xHTML code. Improperly formatted code can cause your pages to render in unpredictable ways or not at all in various browsers.
The W3C offers a free validator that you can run any html page through:
You can also access the validator through the “Tools” menu in the Web developer toolbar.
Homework | Week 1
- Register as a user of this blog. Post a comment to this blog post to let me know that you are registered and include the address (url) for your ”wordpress blog”. Each week following this you will post a link to your homework on your own WordPress blog in the comments section of this blog.
- Go to WordPress and create a blog that you will use to house your homework for this class. Under appearances, select themes and choose a new theme. Add widgets, fill out the personal info on the blog and create a blog that shows some personality.
- Fill out the student questionnaire.
- Create a del.icio.us account for yourself. Tag three Web Sites that focus on things you learned in today’s class and write a few sentences in the Delicious comment field about how they relate and why they would be a good resource for this class. *Make sure you also add the tag: msuinteractivemedia
- Create a Gravatar account. Take a photo of yourself, upload it to Gravatar and link it to your WordPress blog using the email you used to create the blog.
- Copy the sample HTML page and create a new html page with the content of your resume called “resume.html”. Use all of the new tags we learned today to format your resume. Before you begin, decide which tags map semantically to which parts of the resume. Upload the HTML file to your MSU Web space. Also, please post the text portion of your resume on YOUR blog. Here is an example of a resume.
- Review the HTML basic tags including the lists and be prepared to create additional pages next week.
- Each week when you comment on the class blog, leave me a link to your WordPress site, your Delicious site, your Flickr site and your MSU Web hosting space.

Recent Comments